

Everyone is in for a big treat today! My friend, Renee, made survival candles and is going to share them with you. When I saw she was going to be making them I quickly begged asked nicely if she would be willing to do a guest post on them. She gladly obliged my groveling and did. :)
DIY
Candles - Reeeneeebear Style
A
while back I re-pinned a how to make your
own survival candles.
Like most pins I have, it is an awesome idea that I would
probably never get around to doing. However, after having our
own power outage and almost gagging because all I had at the time
were cinnamon candles, I decided that perhaps this would be a super
useful project.
I
decided to go about this a little differently. I wasn't crazy
about turning two of my pots into a double broiler. I'm all
about easy and fast clean up. So I decided to use my electric
skillet and some aluminum pans. This worked really well so I'm
going to share it with all of you!
The
Materials:

8
oz Canning Jars - I got mine at Walmart. They were very
inexpensive. I want to say it was around $10-15 for 2 cases (24
jars).
10
lb bag of Soy Wax Flakes - I bought these from amazon.com.
You do have to pay for shipping and it seems crazy but all in
all you get a 10 lb bag of really easy to use wax for around
$24.
5"
wicks - Now there are a couple ways you can go about this. You
can buy the tabs and wicks and make your own or you can go the lazy
way and buy a jumbo bag of pre-made wicks here at amazon.com.
They run at $6.22. The shipping looks crazy, but the same
people ship the wax and the wicks so they only charged me shipping
for the wax. Both items came in the same box.
Large
Pan - You can use your judgement on this. I got a small square
cake pan. You could get a larger pan if you want to melt
more wax at one time. This worked pretty well for me. I
could fit 2 smaller pans in at one time. Although to make all
24 candles, it did take me a couple of hours. This is what I
used:

You
don't really need 3 but I couldn't buy just a single one.
Small
pan - I chose a Mini Loaf 5 pack. These are the exact
ones I used:

I
really recommend this size for melting the actual wax. I
was actually able to skip the "measuring cup" step and just
pour the wax directly into the jar from the pan.
Electric
Skillet - You probably already have one of these. If
not....then WHAT do you use when making pancakes? Seriously??!!
:) Okay if you don't have one, you can get a cheap one at
Walmart. I think mine was in the $20 range.
Ove
Glove - Okay, cheesy as it may seem, I have 2 of these things. My
mom got them for me for Christmas and I really love them. You
can usually find them where all the "only seen on TV" stuff
is. I see them at Target all the time. You probably don't
NEED one, but it sure made things easier!
Let's Get Busy!
Now
that you have all the stuff, let's make some candles!!!!!!
1.
Set up your skillet and turn it on! I set it at 350
degrees.
2.
Place the larger pan directly on the skillet. Fill this
pan halfway with water.
- Fill up the smaller pans with wax. Go ahead and fill them all the way to the top. Trust me. It will be alright!

- I really recommend this size for melting the actual wax. I was actually able to skip the "measuring cup" step and just pour the wax directly into the jar from the pan.
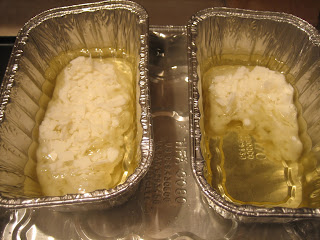


- While you are waiting for the wax to melt completely, start prepping your jars. This consists of taking the lids off and putting a wick in there. Don't worry about if things are perfectly centered or anything. We will work on that later!

it's time to pour it into
the jars. I put on my handy ove glove and just picked the small
pan up by the sides and poured the wax into the jars directly. To
start out only pour about one inch of wax in each jar.

Now go ahead and center
the METAL part of the wick. The actual wick will be leaning
every which way. That's okay. Right now we just want the
metal part centered. After that wax has cooled a little bit,
you can straighten the actual wick. By having a little bit of
wax in the jar and letting it cool, you will be able to pull on the
wick without the metal part moving. While you are doing this,
you should start melting 2 more pans of wax.
I would keep
pouring a little in each jar so you can give that wax time to cool.
See
how the wax has dried and now I can straighten my wick without moving
the whole darn thing! This really doesn't take very long. The
less wax you put in, the faster it dries. Just make sure you
put in enough to cover the metal thing.

- Eventually, you can pour in the rest of the wax. Don't fill them all the way up to the top. Leave some room. I only filled the "smooth" part of the jar.


Now
your wick might go wonky. Don't worry. You will have
plenty of opportunities to straighten it as it dries. Here
you can see my candles at varies "drying" stages. It
looks funny but they will all turn out the same. I promise.
- When the candle is almost all the way dry (meaning you can press on the top and your finger only makes a small indent or better yet none at all!), go ahead and trim your wick. I wish I could tell you a length, but to be honest I just trimmed them short enough so I could put the lid on :)

See
and the wick is centered for the most part!
Clean
up after this project is a snap. If you spilled any wax on your
counter top it is very easy to scrape off and doesn't leave a
residue. The pans you can either keep for your next candle
making adventure or throw them away!
Congratulations!
You have successfully made emergency candles! I kept the
canning jar box and put the candles back in the box for easy storage.
I also slipped a little pack of matches in each row just in
case I couldn't find my Aim N' Flame :)

Now
I'm not sure how long these candles will last. I went ahead and
burnt one just to see how it worked and it is a very nice burning
candle. It burned very even. I had it going for about 4
hours and it barely burned any of it at all so I'm thinking they
would last a pretty long time. I suppose if you wanted to get
all fancy you could get some scent to put in there or dye to make the
wax a fancy color, but I wanted these for the sole purpose of having
something in case of an emergency.
Either
way, now I'm ready for the next time the electricity goes off or the
zombie apocalypse!
~~~~~~~~~~~~~~~~~~~~~~~~~~~~~~~~~~~~
Isn't this awesome!?! I am going to make some of these. I also think they would be great to give people as a little "survival" gift. We just had a blizzard here last week, but we were lucky enough not to lose power. About 5 years ago we weren't so lucky! We lost power for 5 days! On the 5th day my husband and I drove an hour away and paid an enormous price for a generator. We have since gotten a box installed on the front of the house so all we have to do is plug in the generator without running extension cords. We can run the furnace, deep freeze, fridge, water heater, and one kitchen outlet. If this isn't enough then we can also run the extension cords.
Having a generator is all fine and dandy, but if your power is only going to be out a few hours then you don't want to go to the trouble of setting it up. These candles are PERFECT! Plus you won't be knocked out by the scent of cinnamon...or in my case pine. :) I love pine scented candles. lol
Let us know if you make these!
This post has been linked up with Frugal Tuesday Tip
and
Homemade Mondays
This post has been linked up with Frugal Tuesday Tip
and
Homemade Mondays